|
|
Eric Thorsos
Principal Physicist
Ocean Acoustics Dept.
Applied Physics Laboratory
University of Washington
Kevin Williams
Principal Physicist
Ocean Acoustics Dept.
Applied Physics Laboratory
University of Washington
DJ Tang
Senior Oceanographer
Ocean Acoustics Dept.
Applied Physics Laboratory
University of Washington
Steve Kargl
Senior Physicist
CIMU
Applied Physics Laboratory
University of Washington
Office of Naval Research
CDR Robert Headrick, Code 321OA
Ellen S. Livingston, Code 321OA
Nicholas P. Chotiros, Code 321OA
Kerry W. Commander, Code 321MS
Douglas A. Abraham, Code 321US
|
A chirp sonar survey of the SAX04 site was conducted on 3 May 2004 by Steve Schock and his group from Florida Atlantic University. This was just before the target field burial (5–9 May) and allowed us to fine tune the target field location. The survey vessel was the R/V Mr. Tom. The main survey consisted of 11 tracks with 20 m spacing, all run E to W and nearly parallel to shore. The beginning and ending longitudes were 86 deg 38.450 min W and 86 deg 38.720 min W, respectively. The tracks were designated A1–A11 and the nominal track latitudes were as follows:
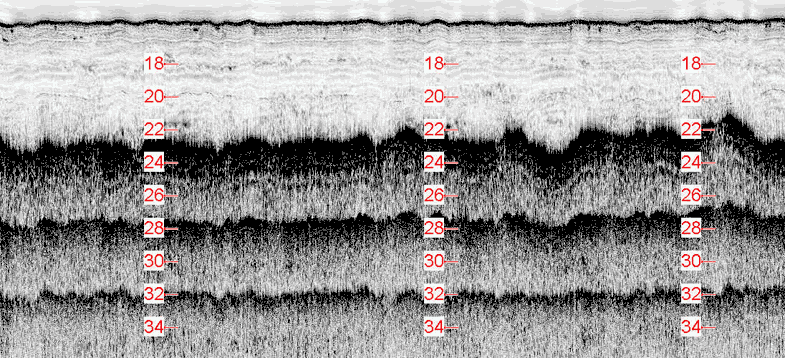
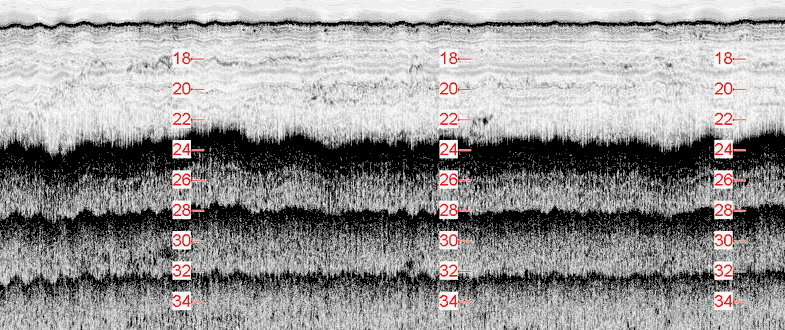
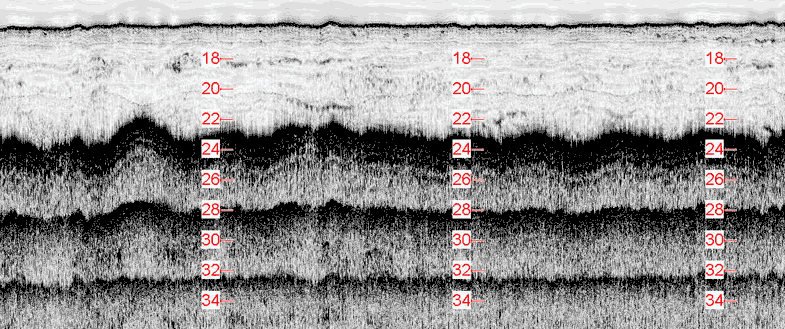
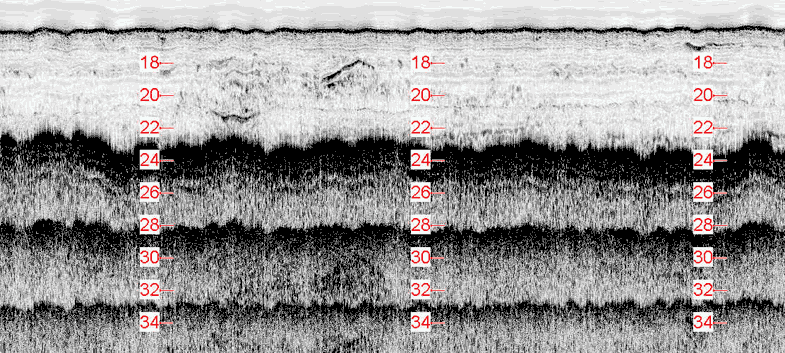
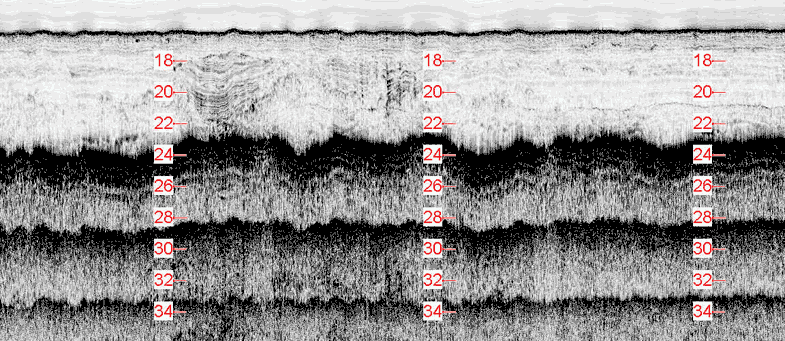
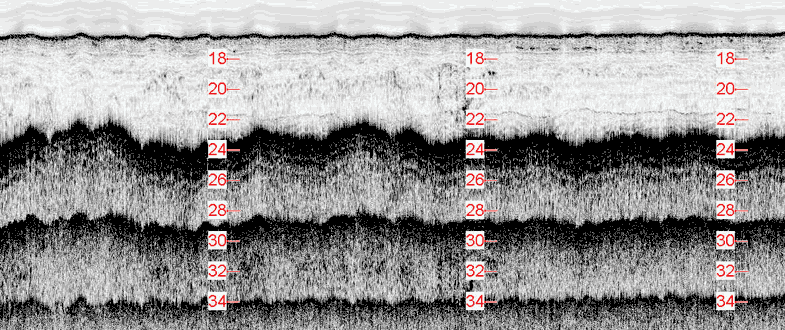
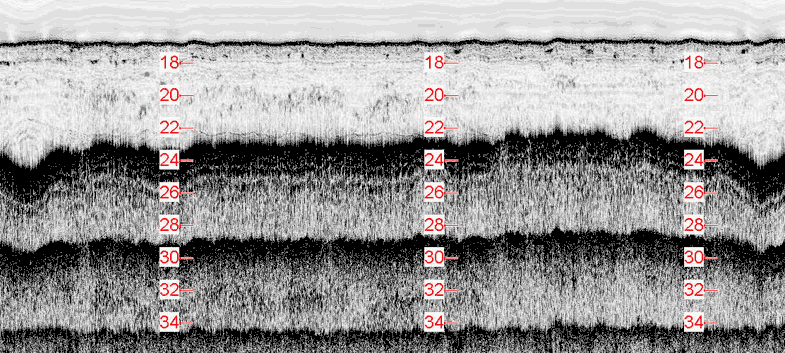
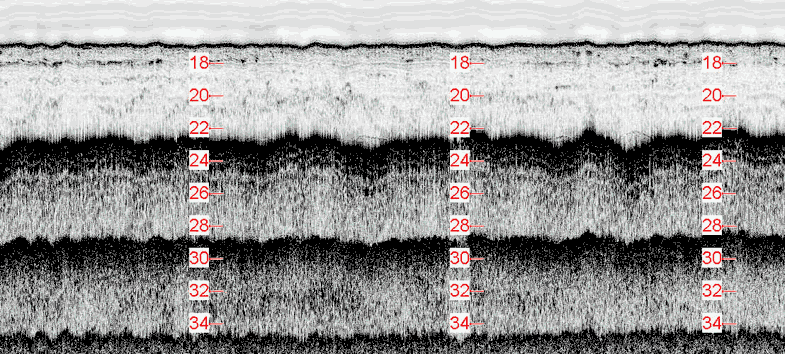
Preliminary data for each track is posted for 1–15-kHz chirp pulses. The results are as obtained on the ship and have not yet been improved by post-processing. In these images, the depth (in meters based on a sound speed of 1500 m/sec) below the sea surface is given in red. The column of depth values on the left in each image denotes the longitude 86 deg 38.500 min W. More precisely, that longitude corresponds to the small tick at the left end of the horizontal dash. The central and right column of depth values denote the longitudes 86 deg 38.600 min W and 86 deg 38.700 min W, respectively. The return from the water-sediment interface is the narrow dark contour near the top. (Side-lobes are present which can be removed in post-processing.) The broad dark band that appears at a depth reading of about 23 m for track A1 is the surface return, so that all relevant data is above that band. The next band down involves both a surface and bottom bounce, and that the lowest band is the bottom-surface-bottom return. The waviness of the water-sediment return is caused mainly by pressure fluctuations at the tow vehicle due to surface waves (which are interpreted as depth fluctuations in the plot), and much less by actual heave of the tow vehicle. The tow depth was about 4 m above the bottom on the first few (shallower) tracks and nearly 6 m above the bottom on the last few (deeper) tracks. (The depth above the bottom can be conveniently read off from the difference between the lower two dark bands [was OK in the original bands]. The total water depth is the difference between the water–sediment interface band and the lowest band.) |
Note that for track A1 there are small discrete features within one meter of the surface just to the right of the left column of depth values and more features over about the right half of the region between the middle and right columns of depth values. We were looking for a 60 m by 60 m region with a minimum of such features for the target field. There were other constraints as well. The  SAX04 layout shows the northern boundary of the target field at about 40 m from the RVSJ. (This layout is actually out-of-date; it shows a 30 m by 30 m target field; the actual field is 60 m by 60 m, but the distance from the northern boundary to the RVSJ is still about 40 m.) The DRDC, ARL-UT, and APL-UW (STMS 1) mobile tower work is shown to the west of the RVSJ location. All could be impacted by subsurface structure, and we wanted to find a benign region for these operations as well. SAX04 layout shows the northern boundary of the target field at about 40 m from the RVSJ. (This layout is actually out-of-date; it shows a 30 m by 30 m target field; the actual field is 60 m by 60 m, but the distance from the northern boundary to the RVSJ is still about 40 m.) The DRDC, ARL-UT, and APL-UW (STMS 1) mobile tower work is shown to the west of the RVSJ location. All could be impacted by subsurface structure, and we wanted to find a benign region for these operations as well.Scanning through the tracks you will note that the left half of the region between the middle and right columns of depth values is relatively free of subsurface structure for tracks A1–A6. (Keep in mind that west is to the right in these images.) At a 30-deg latitude, 0.1 of longitude corresponds to 160 m. Thus, the benign region shown by tracks A1–A6 is at least 80 m E-W and 100 m N-S. Note also the structure that is especially evident in tracks A4–A5 between the left and middle columns of depth values (but affects other tracks to a lesser extent). This feature appears to be a buried river or stream channel and would be best to avoid. Our final choice for the 60 m by 60 m target field has bounding longitudes of 86 deg 38.622 min W and 86 deg 38.660 min W and bounding latitudes of 30 deg 23.221 min N and 30 deg 23.189 min N. This places the northern boundary of the target field between tracks A3 and A4 (closer to A4) and the southern boundary between tracks A6 and A7 (closer to A7). The RVSJ will be centered on a position between tracks A1 and A2 (closer to A2). The E-W position puts the target field mainly on the left half the region between the middle and right columns of depth values in the chirp sonar images. The region off the fantail of the RVSJ near and to the left of the right column of depth values (where the DRDC, ARL-UT, and APL-UW mobile tower work will be done) shows some structure on track A1 but little structure on track A2. One goal of the chirp sonar survey in September will be to survey this region in detail. The tracks in the southern part of the survey area (A8–A11) show more subbottom features and are reminiscent of the SAX99 region just to the south. After the main survey was completed, longer N-S and a S-N tracks were run, which show a similar increase in subbottom structure at deeper depths in the southern segments of the tracks. |